Configuración de HTTPS en el VPS
Vamos a configurar el protocolo HTTPS para el acceso a nuestras aplicaciones, para ello, hay que tener en cuenta lo siguiente:
- Vamos a utilizar el servicio https://letsencrypt.org para solicitar los certificados de nuestras páginas.
- Comprueba que el navegador tiene el certificado de Let’s Encrypt.
- Explica detenidamente cómo se solicita un certificado en Let’s Encrypt. Tienes dos opciones:
- Solicitar un certificado para los nombres que tienes.
- Solicitar un certificado wildcard
*.tunombre.gonzalonazareno.orgque te sirve para todos tus nombres.
- En la explicación deberás responder a estas preguntas:
- ¿Qué función tiene el cliente ACME?
- ¿Qué configuración se realiza en el servidor web?
- ¿Qué pruebas realiza Let’s Encrypt para asegurar que somos los administrados del sitio web?
- ¿Se puede usar el DNS para verificar que somos administradores del sitio?
- Utiliza dos ficheros de configuración de nginx: uno para la configuración del virtualhost HTTP y otro para la configuración del virtualhost HTTPS.
- Realiza una redirección o una reescritura para que cuando accedas a HTTP te redirija al sitio HTTPS.
- Comprueba que se ha creado una tarea cron que renueva el certificado cada 3 meses.
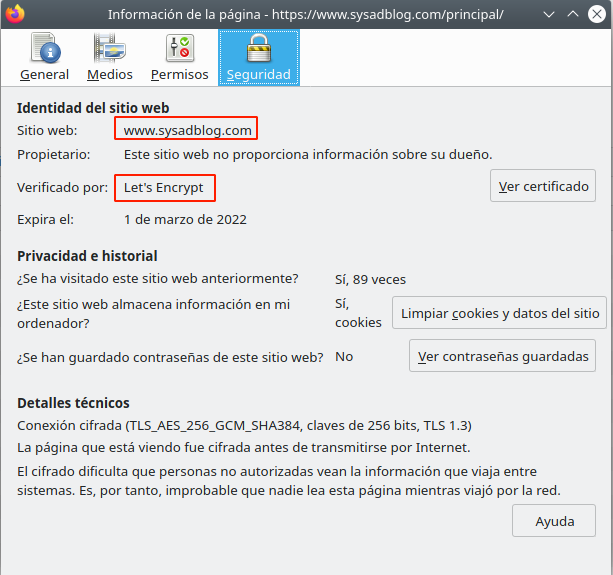
- Comprueba que las páginas son accesible por HTTPS y visualiza los detalles del certificado que has creado.
- Modifica la configuración del cliente de Nextcloud para comprobar que sigue en funcionamiento con HTTPS.
Para poder empezar a usar el servicio que ofrece “Let’s Encrypt” debemos instalarnos primero el agente que nos permitirá automatizar el proceso: “Certbot”.
apt install certbot
Certbot es el agente que realiza las tareas necesarias para generar el certificado haciendo uso del protocolo ACME. La primera vez que hacemos uso de certbot para comunicarnos con “Let’s Encrypt”, este genera un par de claves. Tras esto, tendremos que probar a la autoridad certificadora que somos los administradores del dominio indicado, para lo cuál, en nuestro caso, nos pondrá un desafío llamado “HTTP-01 challenger”. Este desafío consiste básicamente en que certbot coloque un ‘token’ que le envía “Let’s Encrypt” en un fichero accesible por el servidor web y lo firme con su clave privada. Si “Let’s Encrypt” es capaz de acceder al fichero y verificar la firma. podrá validar que somos los administradores del dominio.
También podríamos haber hecho uso del desafío “DNS-01 challenger” para confirmar a “Let’s Encrypt” que somos los administradores del servidor dns del dominio (lo que proporcionaría certificados wildcard para todas las páginas del dominio). Este desafío consistiría en crear un registro en la zona DNS con una determinada información.
Tras esta breve explicación, hay que recordar que el objetivo es que los dominios que tengo registrados en mi vps (son tres en este momento) puedan y sean accedidos usando https.
Así pues, haremos uso del plugin ‘standalone’ el cual nos permite tener un cierto nivel de control sobre la configuración de nuestros virtualhosts. Este plugin utiliza el puerto 80, que es el mismo que utiliza nginx, por lo que habrá que parar el servicio durante un tiempo. Podrían usarse otros plugins que no necesitan de esto, pero como mis páginas apenas tienen tráfico, no tengo ningún inconveniente en parar el servicio. Con esto dicho, procedamos a parar el servicio de nginx:
systemctl stop nginx
Ahora que el servicio se ha detenido, podemos hacer uso de certbot para solicitar los certificados correspondientes para todas los virtualhosts de que disponemos. Usaremos las siguientes opciones con el comando:
- “certonly”: indicamos con esta opción que únicamente queremos generar el certificado.
- “–standalone”: indicamos el plugin que queremos usar (standalone en nuestro caso).
- “-d”: indicamos el nombre del dominio del que queremos el certificado. Como tiene que conectarse con el dominio, es necesario que previamente esté registrado en un servidor DNS y que sea accesible desde el exterior.
certbot certonly --standalone -d portal.sysadblog.com

Saving debug log to /var/log/letsencrypt/letsencrypt.log
Plugins selected: Authenticator standalone, Installer None
Enter email address (used for urgent renewal and security notices)
 (Enter 'c' to cancel): daniparrales16@gmail.com

- - - - - - - - - - - - - - - - - - - - - - - - - - - - - - - - - - - - - - - -
Please read the Terms of Service at
https://letsencrypt.org/documents/LE-SA-v1.2-November-15-2017.pdf. You must
agree in order to register with the ACME server. Do you agree?
- - - - - - - - - - - - - - - - - - - - - - - - - - - - - - - - - - - - - - - -
(Y)es/(N)o: Y

- - - - - - - - - - - - - - - - - - - - - - - - - - - - - - - - - - - - - - - -
Would you be willing, once your first certificate is successfully issued, to
share your email address with the Electronic Frontier Foundation, a founding
partner of the Let's Encrypt project and the non-profit organization that
develops Certbot? We'd like to send you email about our work encrypting the web,
EFF news, campaigns, and ways to support digital freedom.
- - - - - - - - - - - - - - - - - - - - - - - - - - - - - - - - - - - - - - - -
(Y)es/(N)o: N
Account registered.
Requesting a certificate for portal.sysadblog.com
Performing the following challenges:
http-01 challenge for portal.sysadblog.com
Waiting for verification...
Cleaning up challenges

IMPORTANT NOTES:
 - Congratulations! Your certificate and chain have been saved at:
   /etc/letsencrypt/live/portal.sysadblog.com/fullchain.pem
   Your key file has been saved at:
   /etc/letsencrypt/live/portal.sysadblog.com/privkey.pem
   Your certificate will expire on 2022-03-01. To obtain a new or
   tweaked version of this certificate in the future, simply run
   certbot again. To non-interactively renew *all* of your
   certificates, run "certbot renew"
 - If you like Certbot, please consider supporting our work by:

   Donating to ISRG / Let's Encrypt:   https://letsencrypt.org/donate
   Donating to EFF:                    https://eff.org/donate-le
Tras responder a las preguntas ya nos ha generado el certificado correspondiente en el directorio /etc/letsencrypt/live/portal.sysadblog.com. Ahora haremos lo mismo para el resto de virtualhosts (las preguntas solo nos las hará la primera vez):
certbot certonly --standalone -d djangopolls.sysadblog.com

Saving debug log to /var/log/letsencrypt/letsencrypt.log
Plugins selected: Authenticator standalone, Installer None
Requesting a certificate for djangopolls.sysadblog.com
Performing the following challenges:
http-01 challenge for djangopolls.sysadblog.com
Waiting for verification...
Cleaning up challenges

IMPORTANT NOTES:
 - Congratulations! Your certificate and chain have been saved at:
   /etc/letsencrypt/live/djangopolls.sysadblog.com/fullchain.pem
   Your key file has been saved at:
   /etc/letsencrypt/live/djangopolls.sysadblog.com/privkey.pem
   Your certificate will expire on 2022-03-01. To obtain a new or
   tweaked version of this certificate in the future, simply run
   certbot again. To non-interactively renew *all* of your
   certificates, run "certbot renew"
 - If you like Certbot, please consider supporting our work by:

   Donating to ISRG / Let's Encrypt:   https://letsencrypt.org/donate
   Donating to EFF:                    https://eff.org/donate-le

root@blackstar:~# nano /etc/nginx/sites-available/sysadblog
root@blackstar:~# certbot certonly --standalone -d www.sysadblog.com
Saving debug log to /var/log/letsencrypt/letsencrypt.log
Plugins selected: Authenticator standalone, Installer None
Requesting a certificate for www.sysadblog.com
Performing the following challenges:
http-01 challenge for www.sysadblog.com
Waiting for verification...
Cleaning up challenges

IMPORTANT NOTES:
 - Congratulations! Your certificate and chain have been saved at:
   /etc/letsencrypt/live/www.sysadblog.com/fullchain.pem
   Your key file has been saved at:
   /etc/letsencrypt/live/www.sysadblog.com/privkey.pem
   Your certificate will expire on 2022-03-01. To obtain a new or
   tweaked version of this certificate in the future, simply run
   certbot again. To non-interactively renew *all* of your
   certificates, run "certbot renew"
 - If you like Certbot, please consider supporting our work by:

   Donating to ISRG / Let's Encrypt:   https://letsencrypt.org/donate
   Donating to EFF:                    https://eff.org/donate-le
Con esto hemos generado los tres certificados necesarios, así que ya podemos volver a iniciar el servicio de nginx:
systemctl start nginx
Podemos ver los ficheros que ha generado si ejecutamos un tree sobre el directorio:
tree /etc/letsencrypt/live/
/etc/letsencrypt/live/
├── djangopolls.sysadblog.com
│             ├── cert.pem -> ../../archive/djangopolls.sysadblog.com/cert1.pem
│             ├── chain.pem -> ../../archive/djangopolls.sysadblog.com/chain1.pem
│             ├── fullchain.pem -> ../../archive/djangopolls.sysadblog.com/fullchain1.pem
│             ├── privkey.pem -> ../../archive/djangopolls.sysadblog.com/privkey1.pem
│             └── README
├── portal.sysadblog.com
│             ├── cert.pem -> ../../archive/portal.sysadblog.com/cert1.pem
│             ├── chain.pem -> ../../archive/portal.sysadblog.com/chain1.pem
│             ├── fullchain.pem -> ../../archive/portal.sysadblog.com/fullchain1.pem
│             ├── privkey.pem -> ../../archive/portal.sysadblog.com/privkey1.pem
│             └── README
├── README
└── www.sysadblog.com
    ├── cert.pem -> ../../archive/www.sysadblog.com/cert1.pem
    ├── chain.pem -> ../../archive/www.sysadblog.com/chain1.pem
    ├── fullchain.pem -> ../../archive/www.sysadblog.com/fullchain1.pem
    ├── privkey.pem -> ../../archive/www.sysadblog.com/privkey1.pem
    └── README
Como vemos ha generado varios ficheros:
- “cart.pem”: Es el certificado en sí (contiene nuestra clave pública).
- “chain.pem”: Es el certificado de Let’s Encrypt asociado a la clave privada con la que han firmado nuestro certificado. Es el certificado necesario para que los clientes puedan comprobar la firma de nuestros certificados.
- “fullchain.pem”: Es la unión de los ficheros “cart.pem” y “chain.pem”. Suele ser el certificado al que nos referiremos, ya que de esta forma solo mandaremos un fichero.
- “privkey.pem”: Es nuestra clave privada.
Podemos utilizar el siguiente comando para ver información sobre los certificados que tenemos:
certbot certificates

Saving debug log to /var/log/letsencrypt/letsencrypt.log

- - - - - - - - - - - - - - - - - - - - - - - - - - - - - - - - - - - - - - - -
Found the following certs:
  Certificate Name: djangopolls.sysadblog.com
    Serial Number: 321e1f22e78947f276df4b6248bc3e2bc02
    Key Type: RSA
    Domains: djangopolls.sysadblog.com
    Expiry Date: 2022-03-01 15:30:37+00:00 (VALID: 89 days)
    Certificate Path: /etc/letsencrypt/live/djangopolls.sysadblog.com/fullchain.pem
    Private Key Path: /etc/letsencrypt/live/djangopolls.sysadblog.com/privkey.pem
  Certificate Name: portal.sysadblog.com
    Serial Number: 3c0608c748ba11484cb1055ec72ca402472
    Key Type: RSA
    Domains: portal.sysadblog.com
    Expiry Date: 2022-03-01 15:20:49+00:00 (VALID: 89 days)
    Certificate Path: /etc/letsencrypt/live/portal.sysadblog.com/fullchain.pem
    Private Key Path: /etc/letsencrypt/live/portal.sysadblog.com/privkey.pem
  Certificate Name: www.sysadblog.com
    Serial Number: 3b7a37fd1921c578f137277c0df96f38963
    Key Type: RSA
    Domains: www.sysadblog.com
    Expiry Date: 2022-03-01 15:32:43+00:00 (VALID: 89 days)
    Certificate Path: /etc/letsencrypt/live/www.sysadblog.com/fullchain.pem
    Private Key Path: /etc/letsencrypt/live/www.sysadblog.com/privkey.pem
- - - - - - - - - - - - - - - - - - - - - - - - - - - - - - - - - - - - - - - -
Como podemos ver, los certificados que hemos obtenido son válidos durante tres meses (90 días). Para renovarlos tenemos dos opciones, o los renovamos manualmente, o dejamos que actúe el trabajo “cron” que ha creado certbot. Podemos visualizar dicho trabajo cron en el directorio /etc/cron.d/:
cat /etc/cron.d/certbot

SHELL=/bin/sh
PATH=/usr/local/sbin:/usr/local/bin:/sbin:/bin:/usr/sbin:/usr/bin

0 */12 * * * root test -x /usr/bin/certbot -a \! -d /run/systemd/system && perl -e 'sleep int(rand(43200))' && certbot -q renew
Este trabajo cron se activa cada 12 horas y comprueba si al certificado le quedan menos de 30 días de validez, y si es así, lo renueva.
Ahora ya podemos empezar a configurar los seis virtualhosts que nos han pedido (tres para http y tres para https):
nano /etc/nginx/sites-available/sysadblog_https

server {
    listen 443 ssl http2;
    listen [::]:443 http2;

    ssl on;
    ssl_certificate /etc/letsencrypt/live/www.sysadblog.com/fullchain.pem;
    ssl_certificate_key /etc/letsencrypt/live/www.sysadblog.com/privkey.pem;

    root /var/www/sysadblog;

    index index.html index.htm index.nginx-debian.html;

    server_name www.sysadblog.com;

    rewrite ^/$ http://www.sysadblog.com/principal permanent;
    location /principal {
        autoindex off;
        disable_symlinks on;
    }

    location /principal/documentos {
        alias /srv/doc;
        autoindex on;
        disable_symlinks off;
    }

    location /secreto {
        auth_basic "Area secreta";
        auth_basic_user_file /etc/apache2/.htpasswd;
    }

    location ~ \.php$ {
               include snippets/fastcgi-php.conf;
               fastcgi_pass unix:/run/php/php7.4-fpm.sock;
        }


    error_page 404 /error/404.html;
    error_page 403 /error/403.html;


    location / {
        try_files $uri $uri/ =404;
    }


    location = /robots.txt {
            allow all;
            log_not_found off;
            access_log off;
        }

        location /.well-known {
#            rewrite ^/.well-known/host-meta.json  /cloud/public.php?service=host-meta-json    last;
#            rewrite ^/.well-known/host-meta        /cloud/public.php?service=host-meta         last;
#            rewrite ^/.well-known/webfinger        /cloud/public.php?service=webfinger         last;
#            rewrite ^/.well-known/nodeinfo         /cloud/public.php?service=nodeinfo          last;

            location = /.well-known/carddav   { return 301 /cloud/remote.php/dav/; }
            location = /.well-known/caldav    { return 301 /cloud/remote.php/dav/; }

        location /.well-known/acme-challenge    { try_files $uri $uri/ =404; }
            location /.well-known/pki-validation    { try_files $uri $uri/ =404; }

            try_files $uri $uri/ =404;
        }

        location ^~ /cloud {
            client_max_body_size 512M;
            fastcgi_buffers 64 4K;

            gzip on;
            gzip_vary on;
            gzip_comp_level 4;
            gzip_min_length 256;
            gzip_proxied expired no-cache no-store private no_last_modified no_etag auth;
            gzip_types application/atom+xml application/javascript application/json application/ld+json application/manifest+json application/rss+xml application/vnd.geo+json application/vnd.ms-fontobject application/x-font-ttf application/x-web-app-manifest+json application/xhtml+xml application/xml font/opentype image/bmp image/svg+xml image/x-icon text/cache-manifest text/css text/plain text/vcard text/vnd.rim.location.xloc text/vtt text/x-component text/x-cross-domain-policy;

            add_header Referrer-Policy                      "no-referrer"   always;
            add_header X-Content-Type-Options               "nosniff"       always;
            add_header X-Download-Options                   "noopen"        always;
            add_header X-Frame-Options                      "SAMEORIGIN"    always;
            add_header X-Permitted-Cross-Domain-Policies    "none"          always;
            add_header X-Robots-Tag                         "none"          always;
            add_header X-XSS-Protection                     "1; mode=block" always;

            fastcgi_hide_header X-Powered-By;

            index index.php index.html /cloud/index.php$request_uri;

            expires 1m;

            location = /cloud {
                if ( $http_user_agent ~ ^DavClnt ) {
                    return 302 /cloud/remote.php/webdav/$is_args$args;
                }
            }

            location ~ ^/cloud/(?:build|tests|config|lib|3rdparty|templates|data)(?:$|/)    { return 404; }
            location ~ ^/cloud/(?:\.|autotest|occ|issue|indie|db_|console)                { return 404; }

            location ~ \.php(?:$|/) {
                fastcgi_split_path_info ^(.+?\.php)(/.*)$;
                set $path_info $fastcgi_path_info;

                try_files $fastcgi_script_name =404;

                include fastcgi_params;
                fastcgi_param SCRIPT_FILENAME $document_root$fastcgi_script_name;
                fastcgi_param PATH_INFO $path_info;

                fastcgi_param modHeadersAvailable true;
                fastcgi_param front_controller_active true;
                fastcgi_pass unix:/run/php/php7.4-fpm.sock;

                fastcgi_intercept_errors on;
                fastcgi_request_buffering off;
            }

            location ~ \.(?:css|js|svg|gif)$ {
                try_files $uri /cloud/index.php$request_uri;
                expires 6M;
                access_log off;
            }

            location ~ \.woff2?$ {
                try_files $uri /cloud/index.php$request_uri;
                expires 7d;
                access_log off;
            }

            location /cloud {
                try_files $uri $uri/ /cloud/index.php$request_uri;
            }
        }
}
nano /etc/nginx/sites-available/sysadblog

server {
    listen 80;
    listen [::]:80;

    server_name www.sysadblog.com;

    return 301 https://$host$request_uri;
}
nano /etc/nginx/sites-available/dparrales-mediawiki_https

server {
    listen 443 ssl http2;
    listen [::]:443 ssl http2;

    ssl    on;
    ssl_certificate /etc/letsencrypt/live/portal.sysadblog.com/fullchain.pem;
    ssl_certificate_key /etc/letsencrypt/live/portal.sysadblog.com/privkey.pem;

    root /var/www/www.dparrales-mediawiki.com/mediawiki-1.36.2;

    index index.php index.html index.htm index.nginx-debian.html;

    server_name portal.sysadblog.com;

    location ~ \.php$ {
               include snippets/fastcgi-php.conf;
               fastcgi_pass unix:/run/php/php7.4-fpm.sock;
        }

    location / {
        try_files $uri $uri/ =404;
    }

}
nano /etc/nginx/sites-available/dparrales-mediawiki

server {
    listen 80;
    listen [::]:80;

    server_name portal.sysadblog.com;

    return 301 https://$host$request_uri;
}
nano /etc/nginx/sites-available/django_polls_https

server {
        listen 443 ssl http2;
        listen [::]:443 ssl http2;

    ssl    on;
    ssl_certificate /etc/letsencrypt/live/djangopolls.sysadblog.com/fullchain.pem;
    ssl_certificate_key /etc/letsencrypt/live/djangopolls.sysadblog.com/privkey.pem;

        root /home/dparrales/django_tutorial;

        index index.html index.php index.htm index.nginx-debian.html;

        server_name djangopolls.sysadblog.com;

        location / {
                proxy_pass http://localhost:8000;
                include proxy_params;
        }

    location /static {
        alias /home/dparrales/venv/django/lib/python3.9/site-packages/django/contrib/admin/static;
    }
}
nano /etc/nginx/sites-available/django_polls

server {
        listen 80;
        listen [::]:80;

        server_name djangopolls.sysadblog.com;

    return 301 https://$host$request_uri;
}
Ahora tenemos que crear los nuevos enlaces simbólicos:
ln -s /etc/nginx/sites-available/sysadblog_https /etc/nginx/sites-enabled/sysadblog_https

ln -s /etc/nginx/sites-available/dparrales-mediawiki_https /etc/nginx/sites-enabled/dparrales-mediawiki_https

ln -s /etc/nginx/sites-available/django_polls_https /etc/nginx/sites-enabled/django_polls_https
Con esto, ya podemos reiniciar el servicio de nginx:
systemctl reload nginx
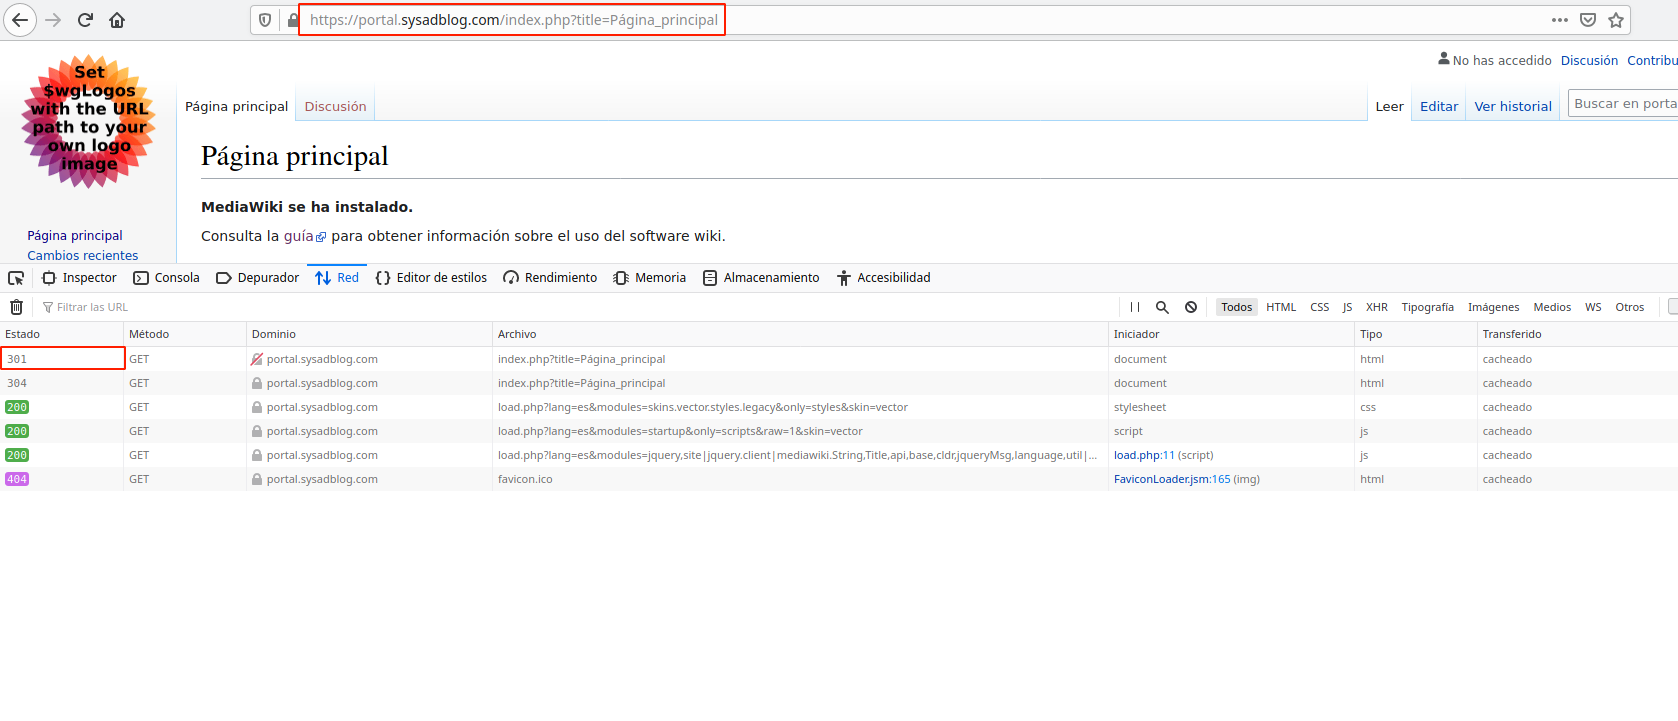
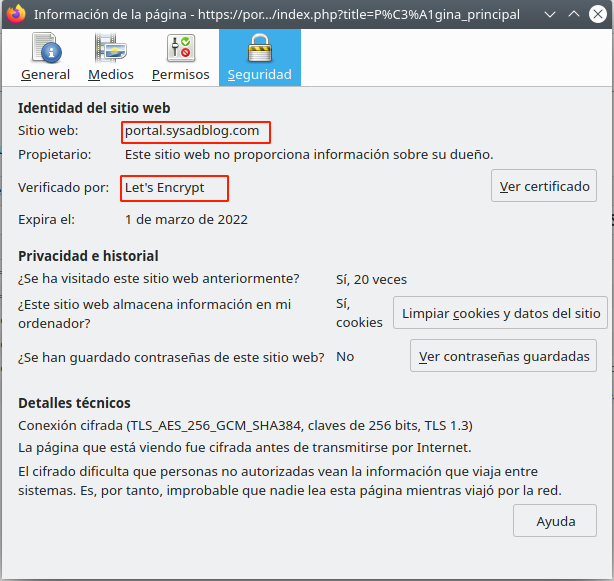
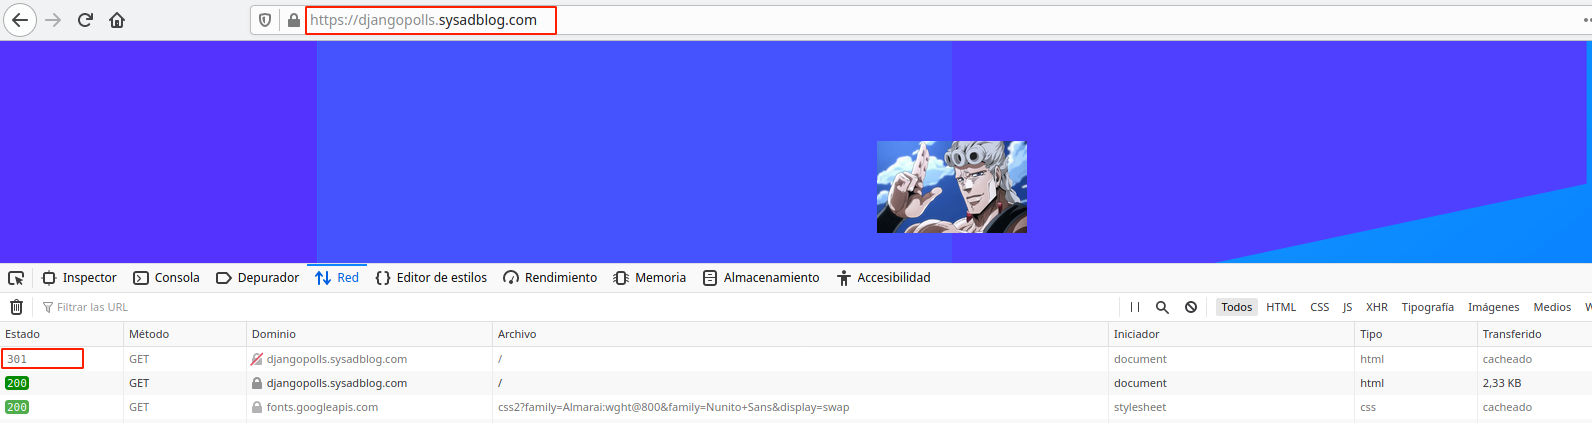
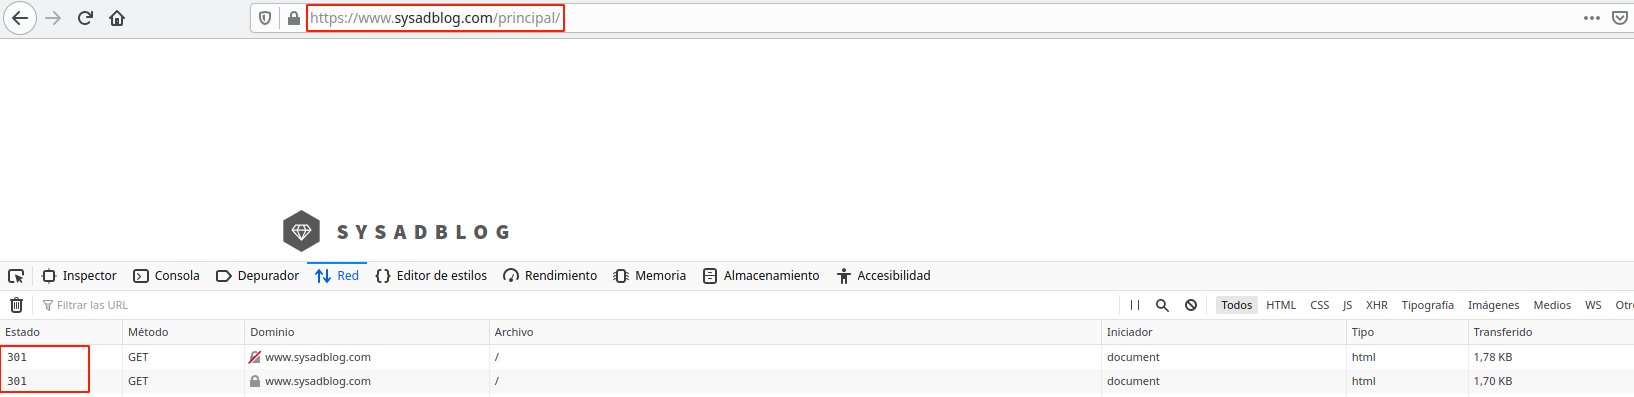
Veamos ahora si funcionan la redirecciones y podemos ver la información del certificado:
portal.sysadblog.com:
djangopolls.sysadblog.com:

www.sysadblog.com:
Para finalizar, vamos a comprobar que el cliente de nextcloud en nuestro escritorio puede conectarse por https:
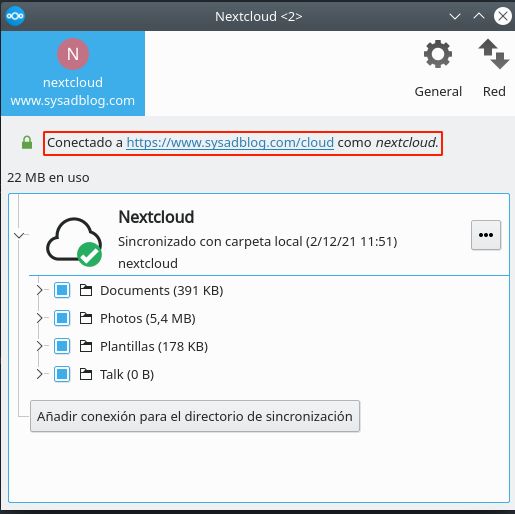
Como vemos, el cliente de nextcloud ha sido capaz de adaptarse por sí mismo a la nueva configuración, así que con esto damos por finalizada la tarea.